


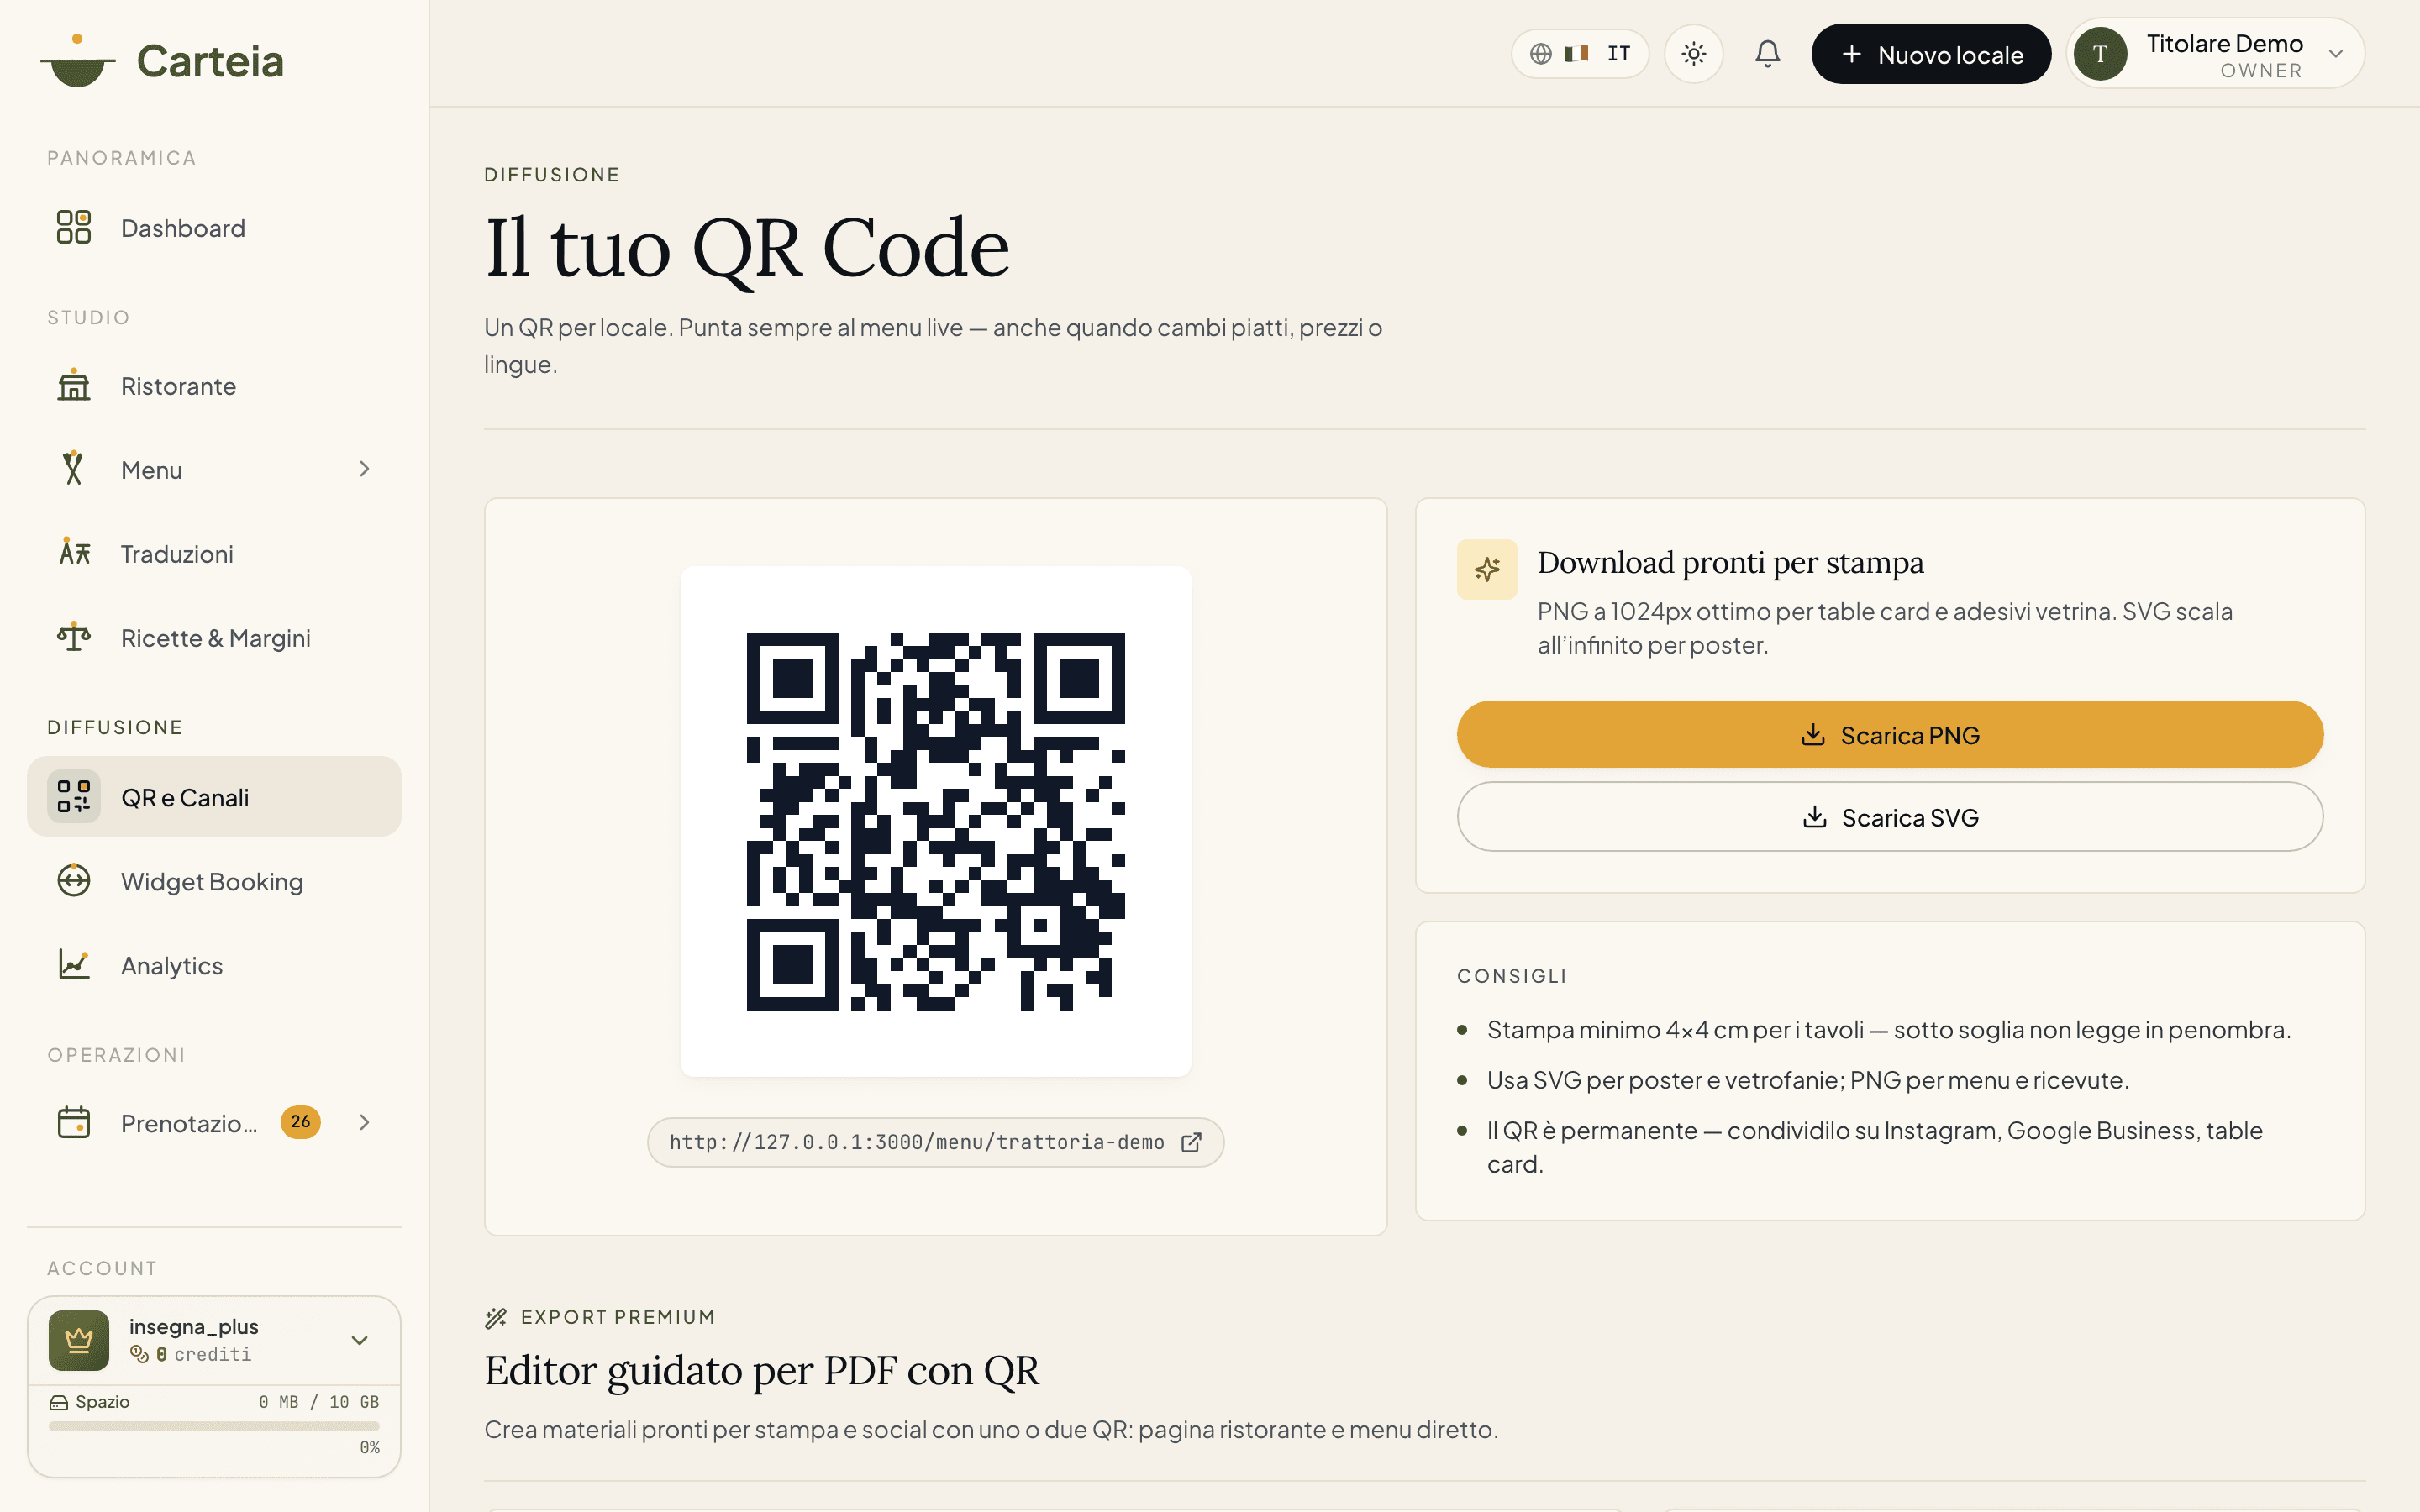

Menu QR Code: download yours and build print materials
On every plan, including Assaggio, you download the menu QR in PNG and SVG, ready to print. From Bistro onward the guided PDF editor unlocks: in 5 steps (layout, destination, copy, colors, background) you build branded print materials for tables, counter, window, social and flyers. On Assaggio the QR center logo is Carteia's; from Osteria onward you remove the Carteia mark; from Bistro onward your own logo sits at the center. The editor unlocks with the subscription, not with credits.
In short
The QR Code is the bridge between the table and the menu: the guest points their camera, the menu opens in the browser, no app to install. Carteia gives you the QR on every plan, and from Bistro onward a small guided studio to design branded print materials in minutes.
You have two levels:
- Menu QR ready to download — on every plan, including Assaggio. PNG and SVG already optimized for print.
- Guided PDF editor — from Bistro onward. A 5-step flow that produces branded PDFs ready for table tents, counter, window, social and flyers.
Why it pays off: a good QR on the table means more scans, which means more guests seeing the full menu, the dish photos and the extras (wines, desserts, events). And every scan is measurable in Insights.
What you get on Assaggio
The Assaggio plan includes the menu QR and the download in the two most-used formats.
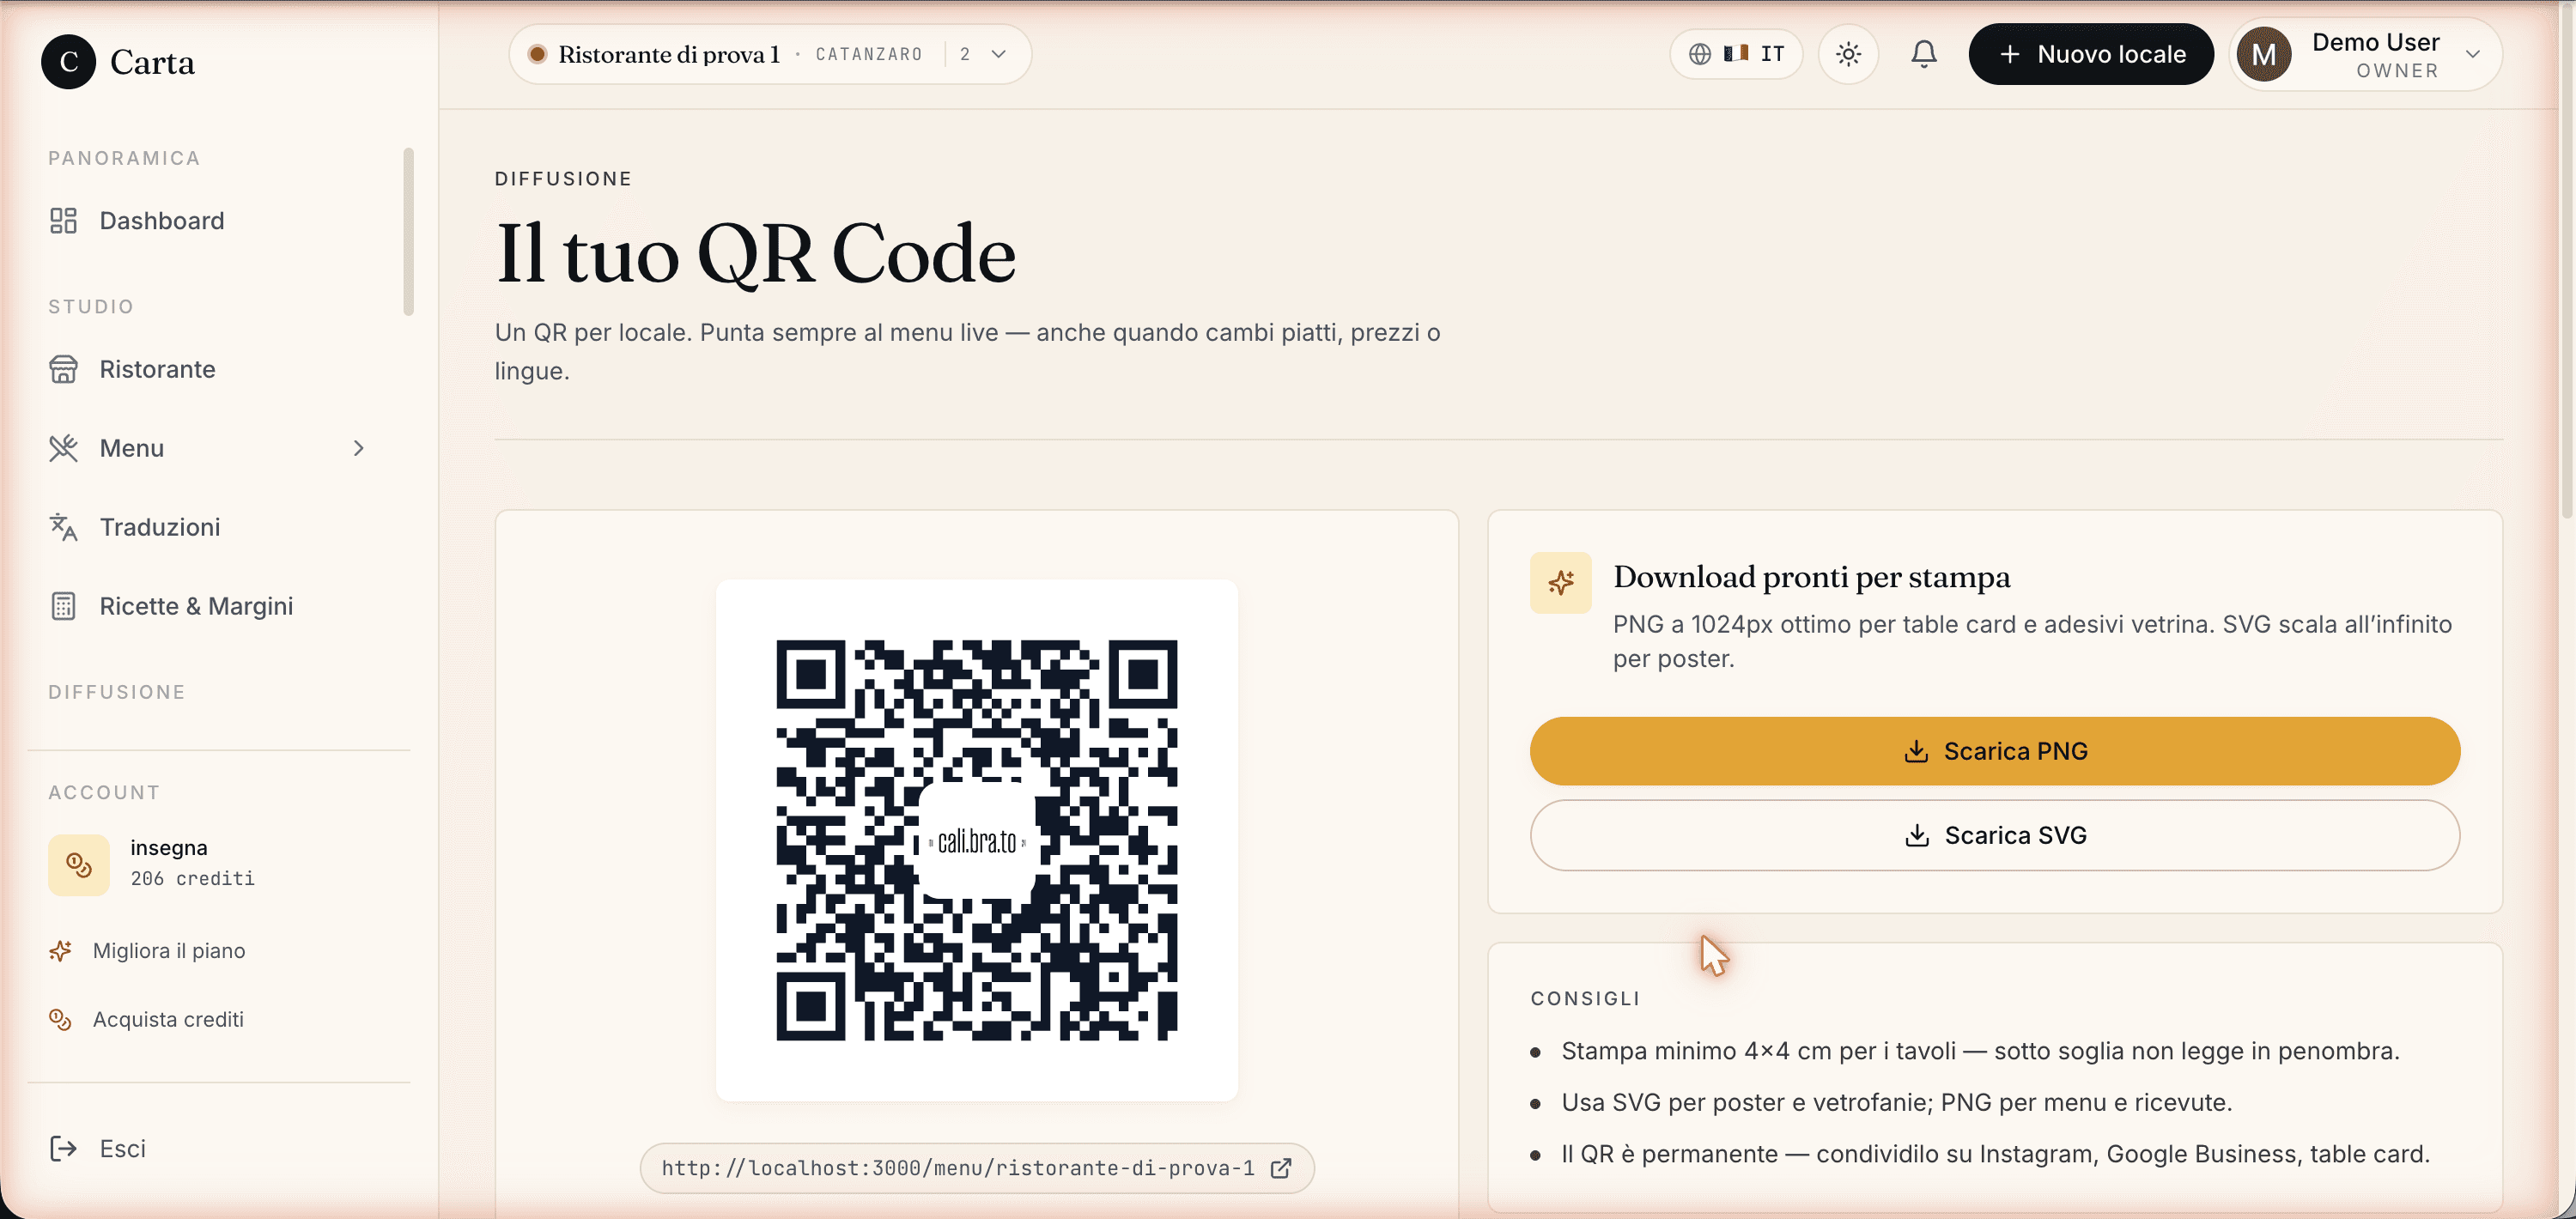
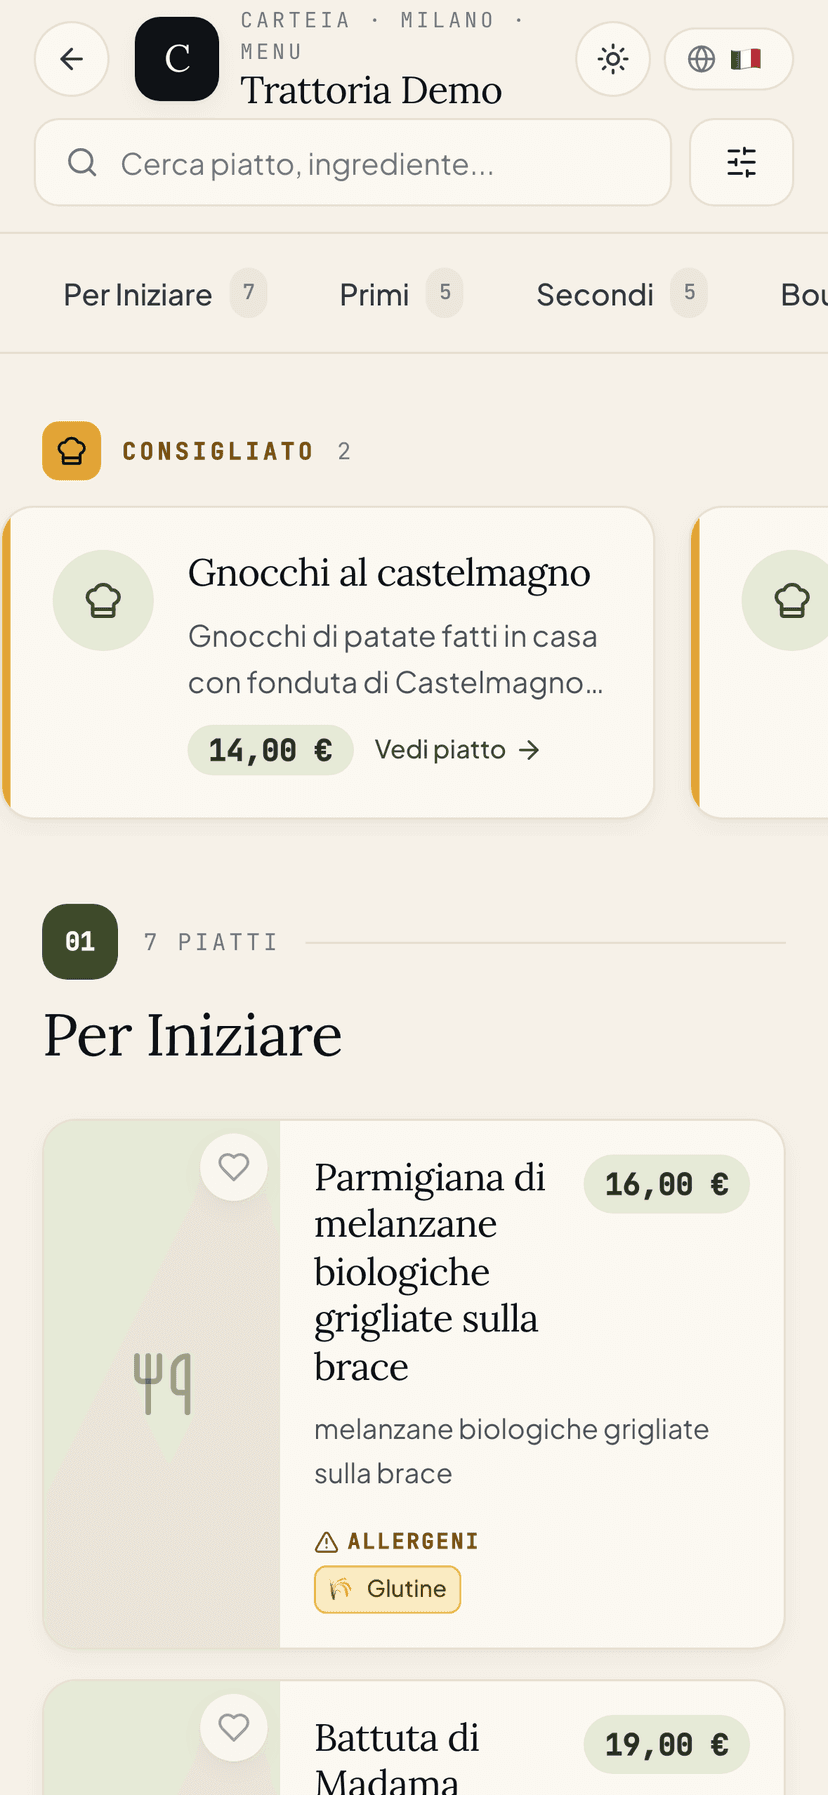
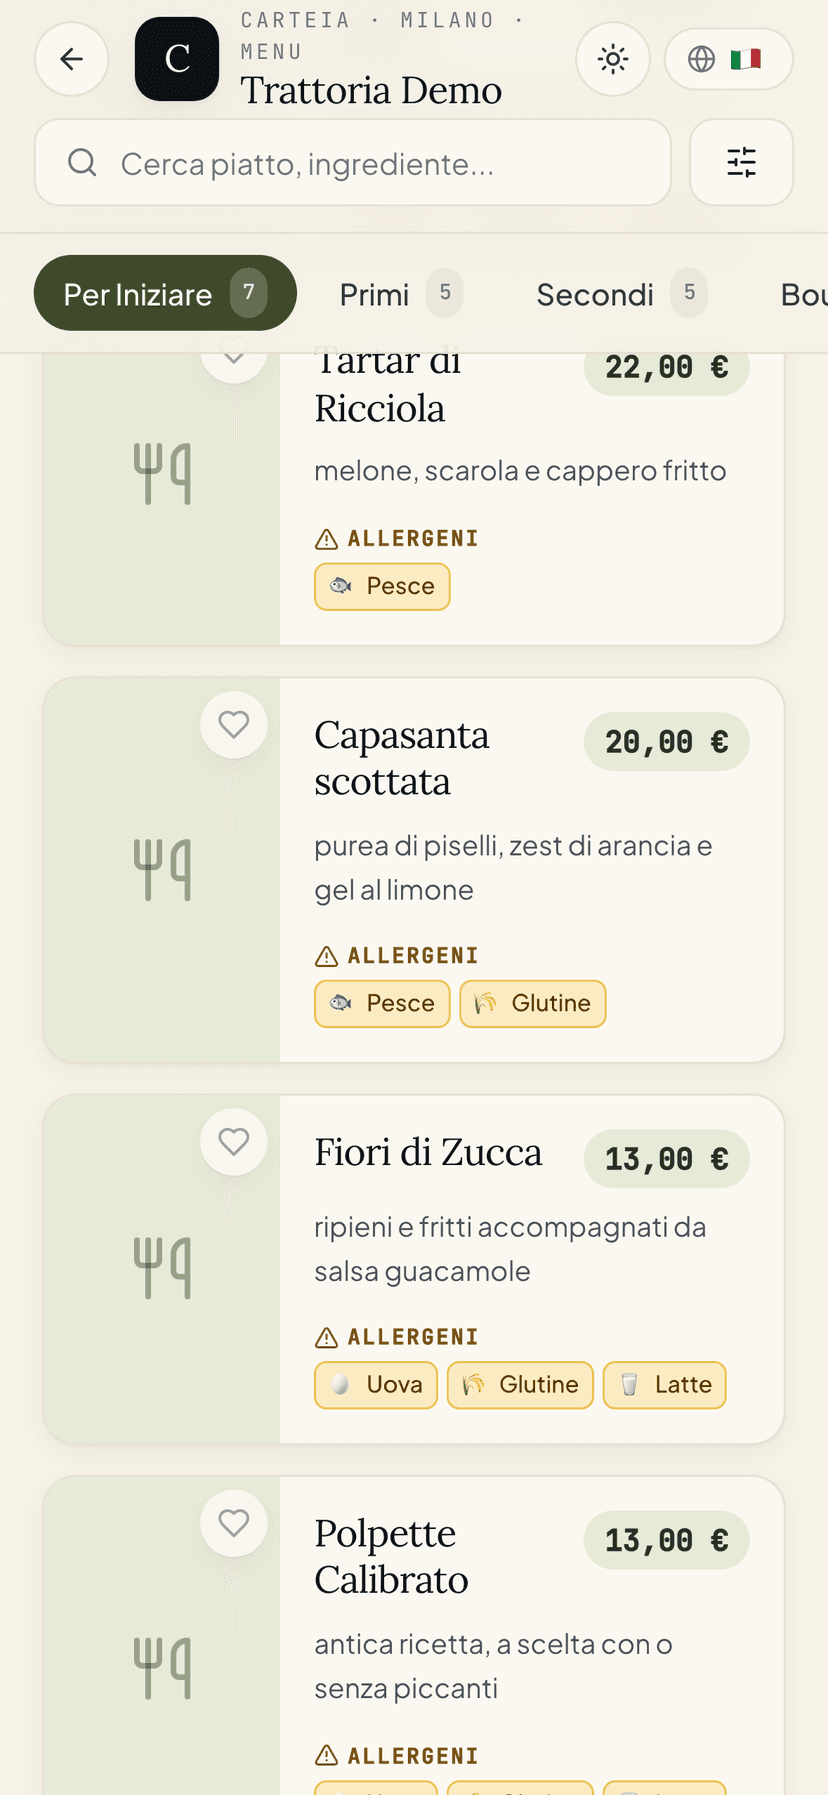
What you can do right away:
- Live preview of the QR, with the link to the menu (it changes by itself if you rename the venue address).
Download PNGat 1024 px — fine for table cards, stickers, receipts, email.Download SVGvector — perfect for large posters and quality print.- Print tips in the side panel: minimum size, material, where to place it.
What is locked on Assaggio:
- Carteia's logo sits at the center of the QR: you cannot swap it for yours.
- The guided PDF editor is not active: you see the button inviting you to a higher plan.
- Per-table QRs (a different QR for each table) arrive from Ristorante onward.
The guided PDF editor (from Osteria onward)
On a paid plan, below the QR you get the guided PDF editor with QR: a 5-step flow that builds branded print materials. Every change shows instantly in the preview on the right; at the end you download a PDF ready for the print shop.
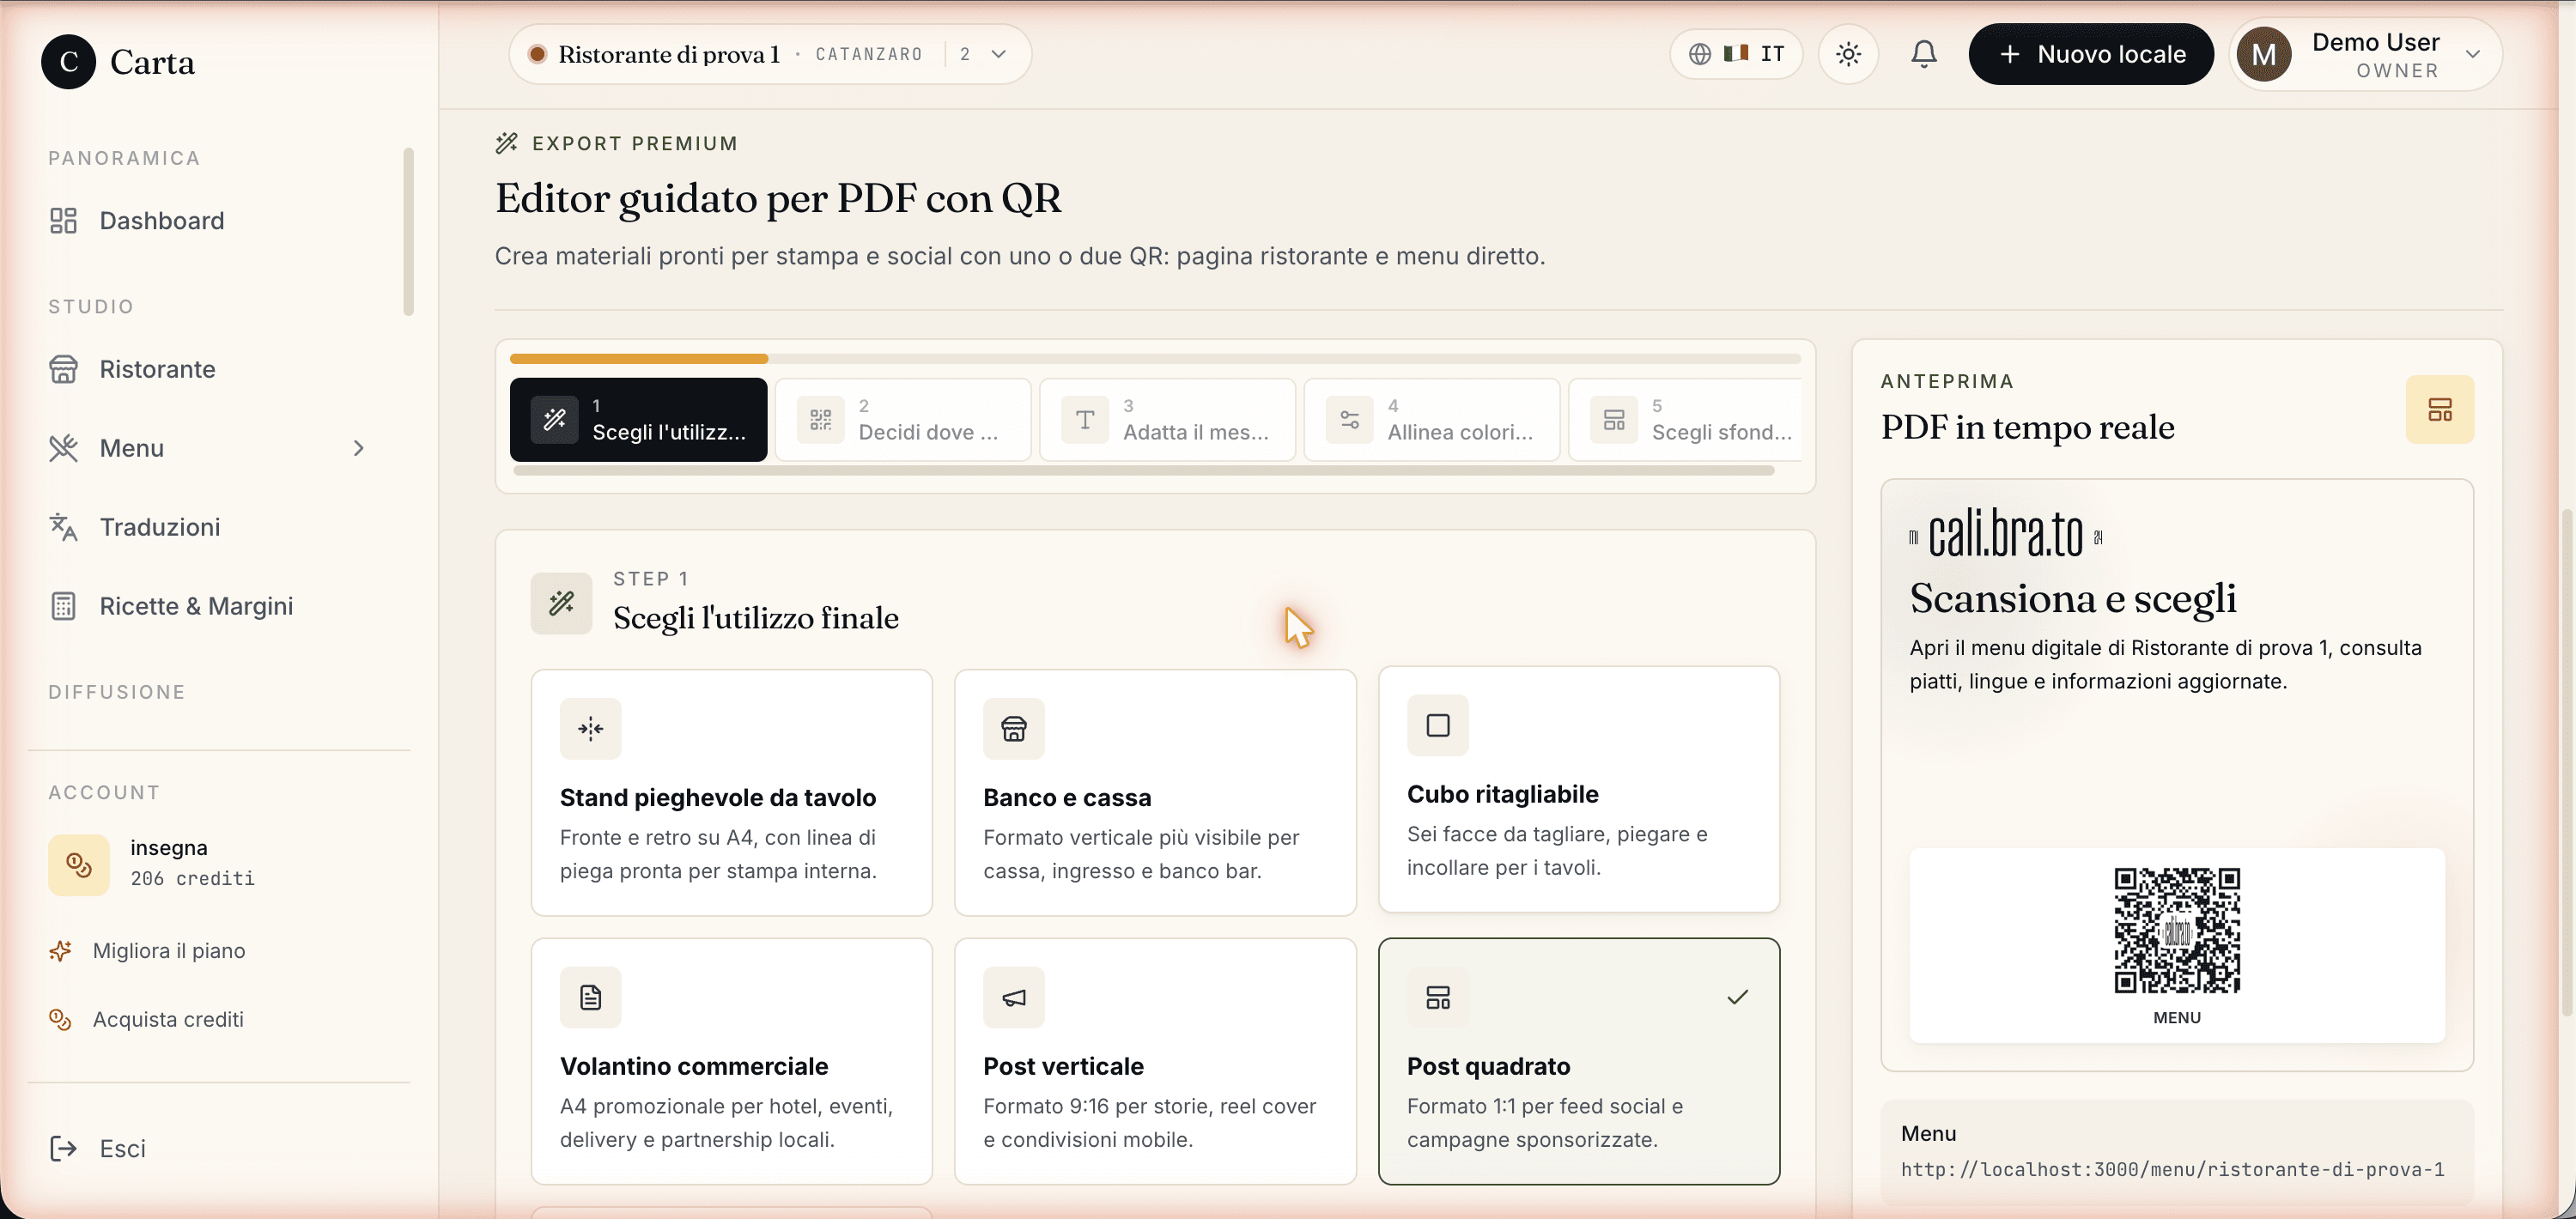
Step 1 — Choose what it's for (Layout)
The 7 layouts are preset for the most common print contexts in a venue. Picking by physical support gets you the right proportions and margins for print.
| Layout | When to use it | Ratio |
|---|---|---|
| Table tent | Dining tables, front/back | 4:3 |
| Counter stand | Counter, vertical, readable standing | 3:4 |
| Cut-out cube | Six faces to cut and assemble | 1:1 |
| Flyer | Promotions, leafleting, mailboxes | 3:4 |
| Vertical post | Instagram / TikTok stories | 9:16 |
| Square post | Social feed | 1:1 |
| Window sticker | Window or door, large clean QR | 5:7 |
Step 2 — Decide where the QRs lead (Destination)
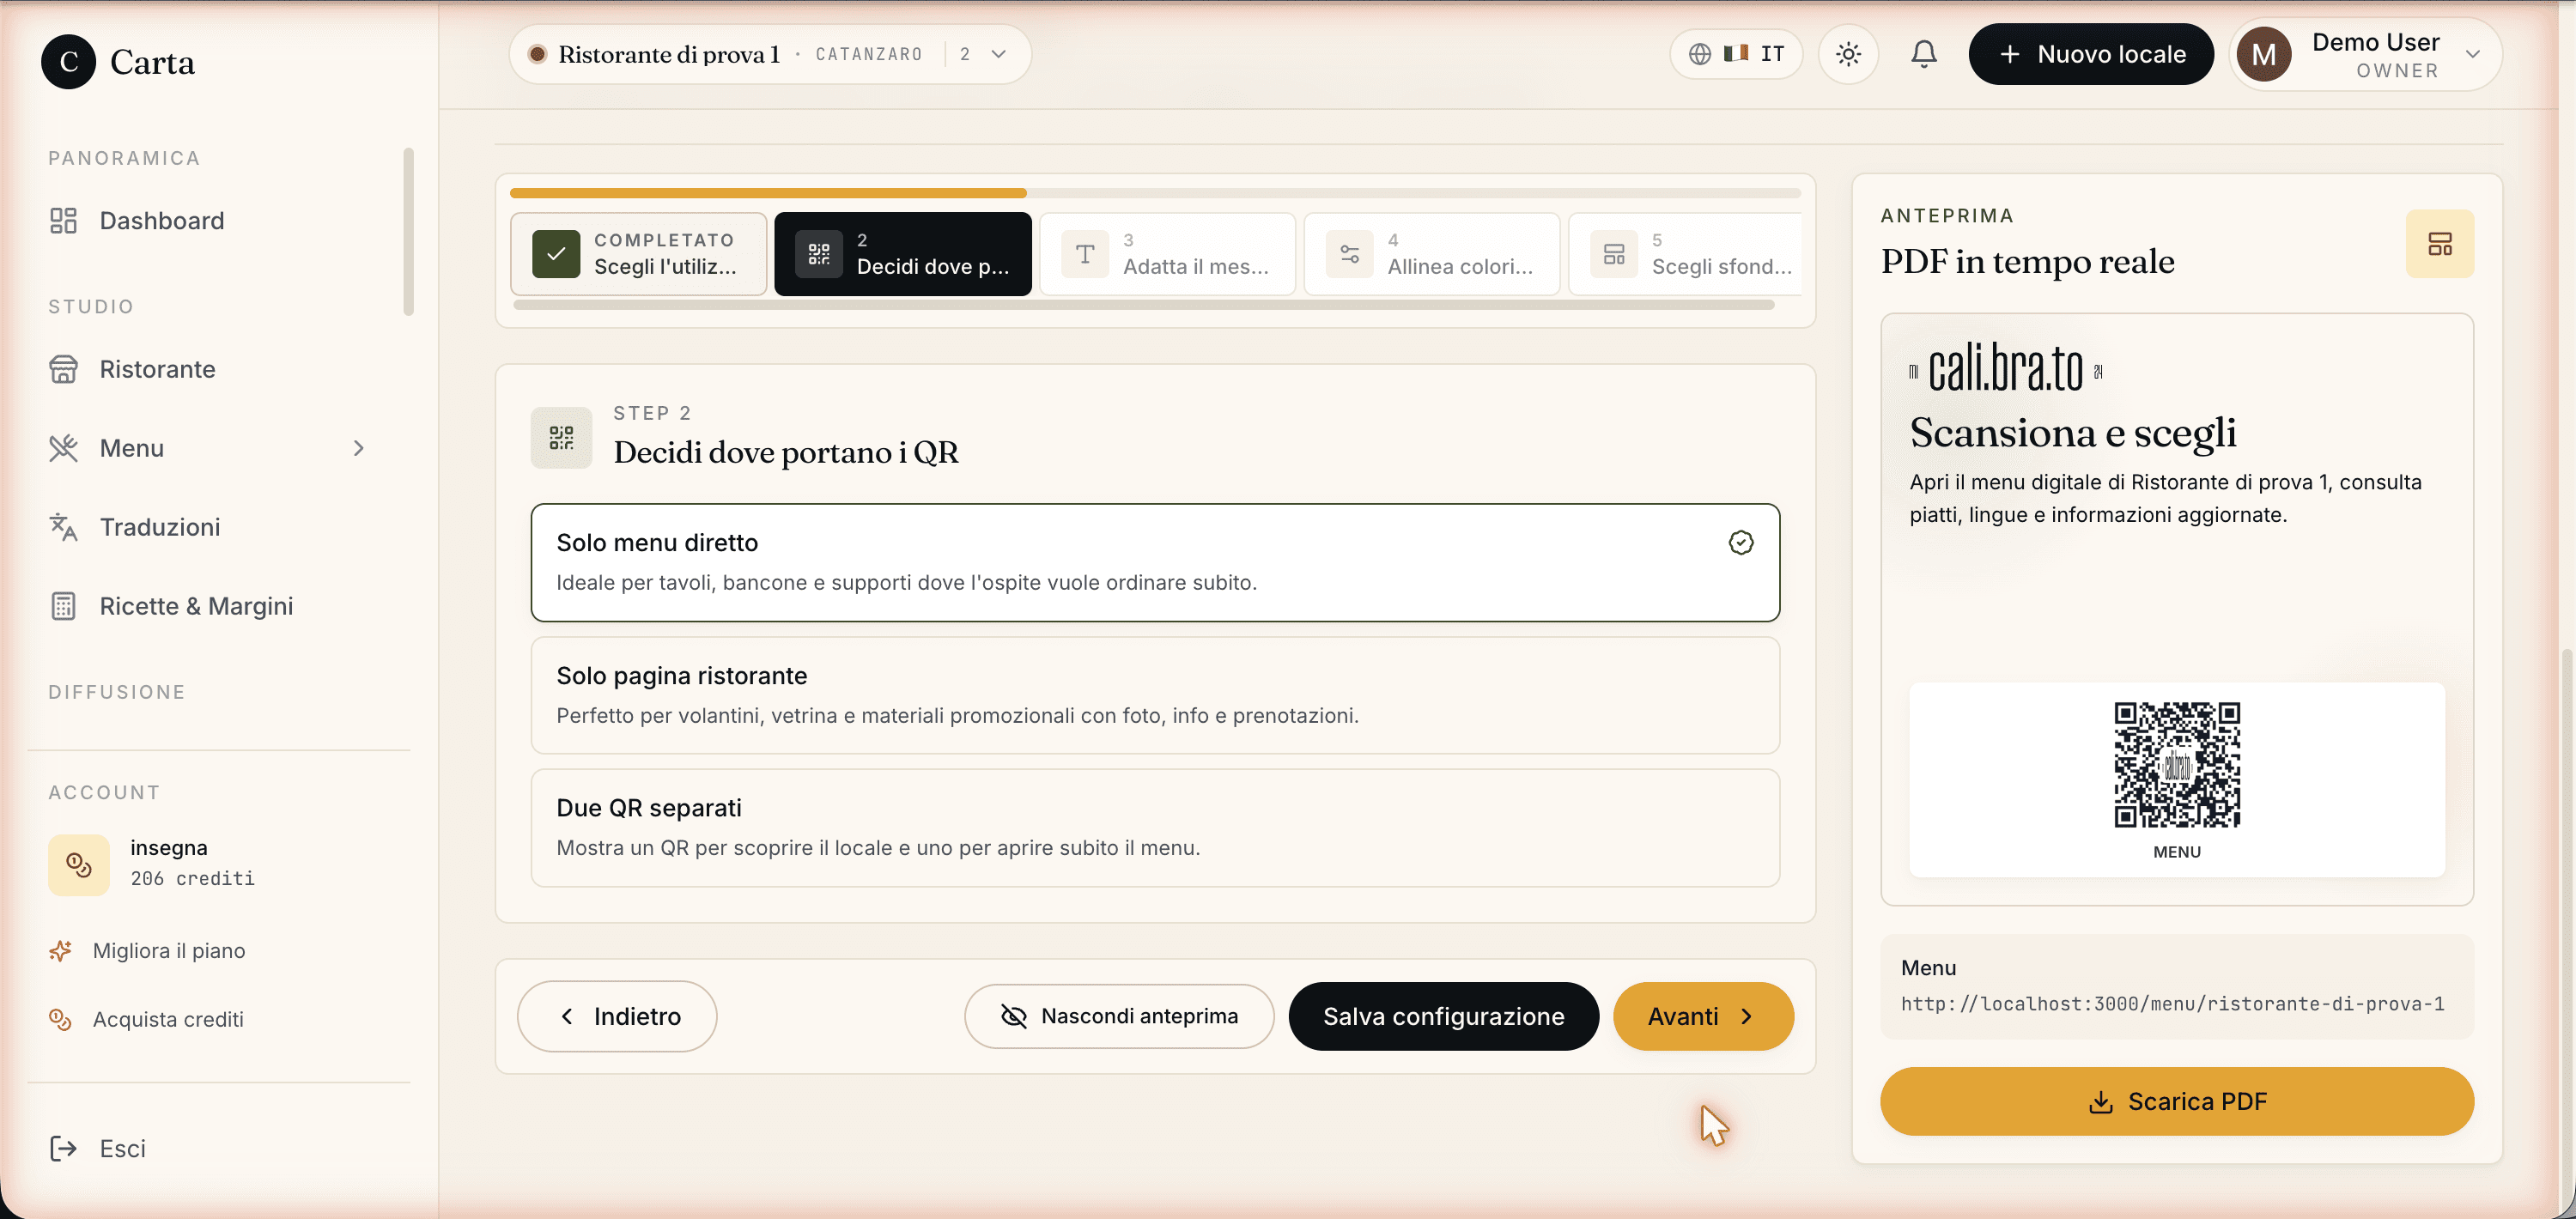
Three destinations:
- Menu only — the QR goes straight to the venue menu. Best for tables, counter, materials where the guest wants to order or browse right away.
- Venue page only — the QR goes to the venue's storefront, with photos, info, map, events and bookings. Best for flyers, window, promotional material.
- Two separate QRs — both QRs end up on the material (one for the venue page, one for the menu), clearly labeled. Handy when the same support must serve both people discovering the venue and guests already seated.
Step 3 — Write the copy
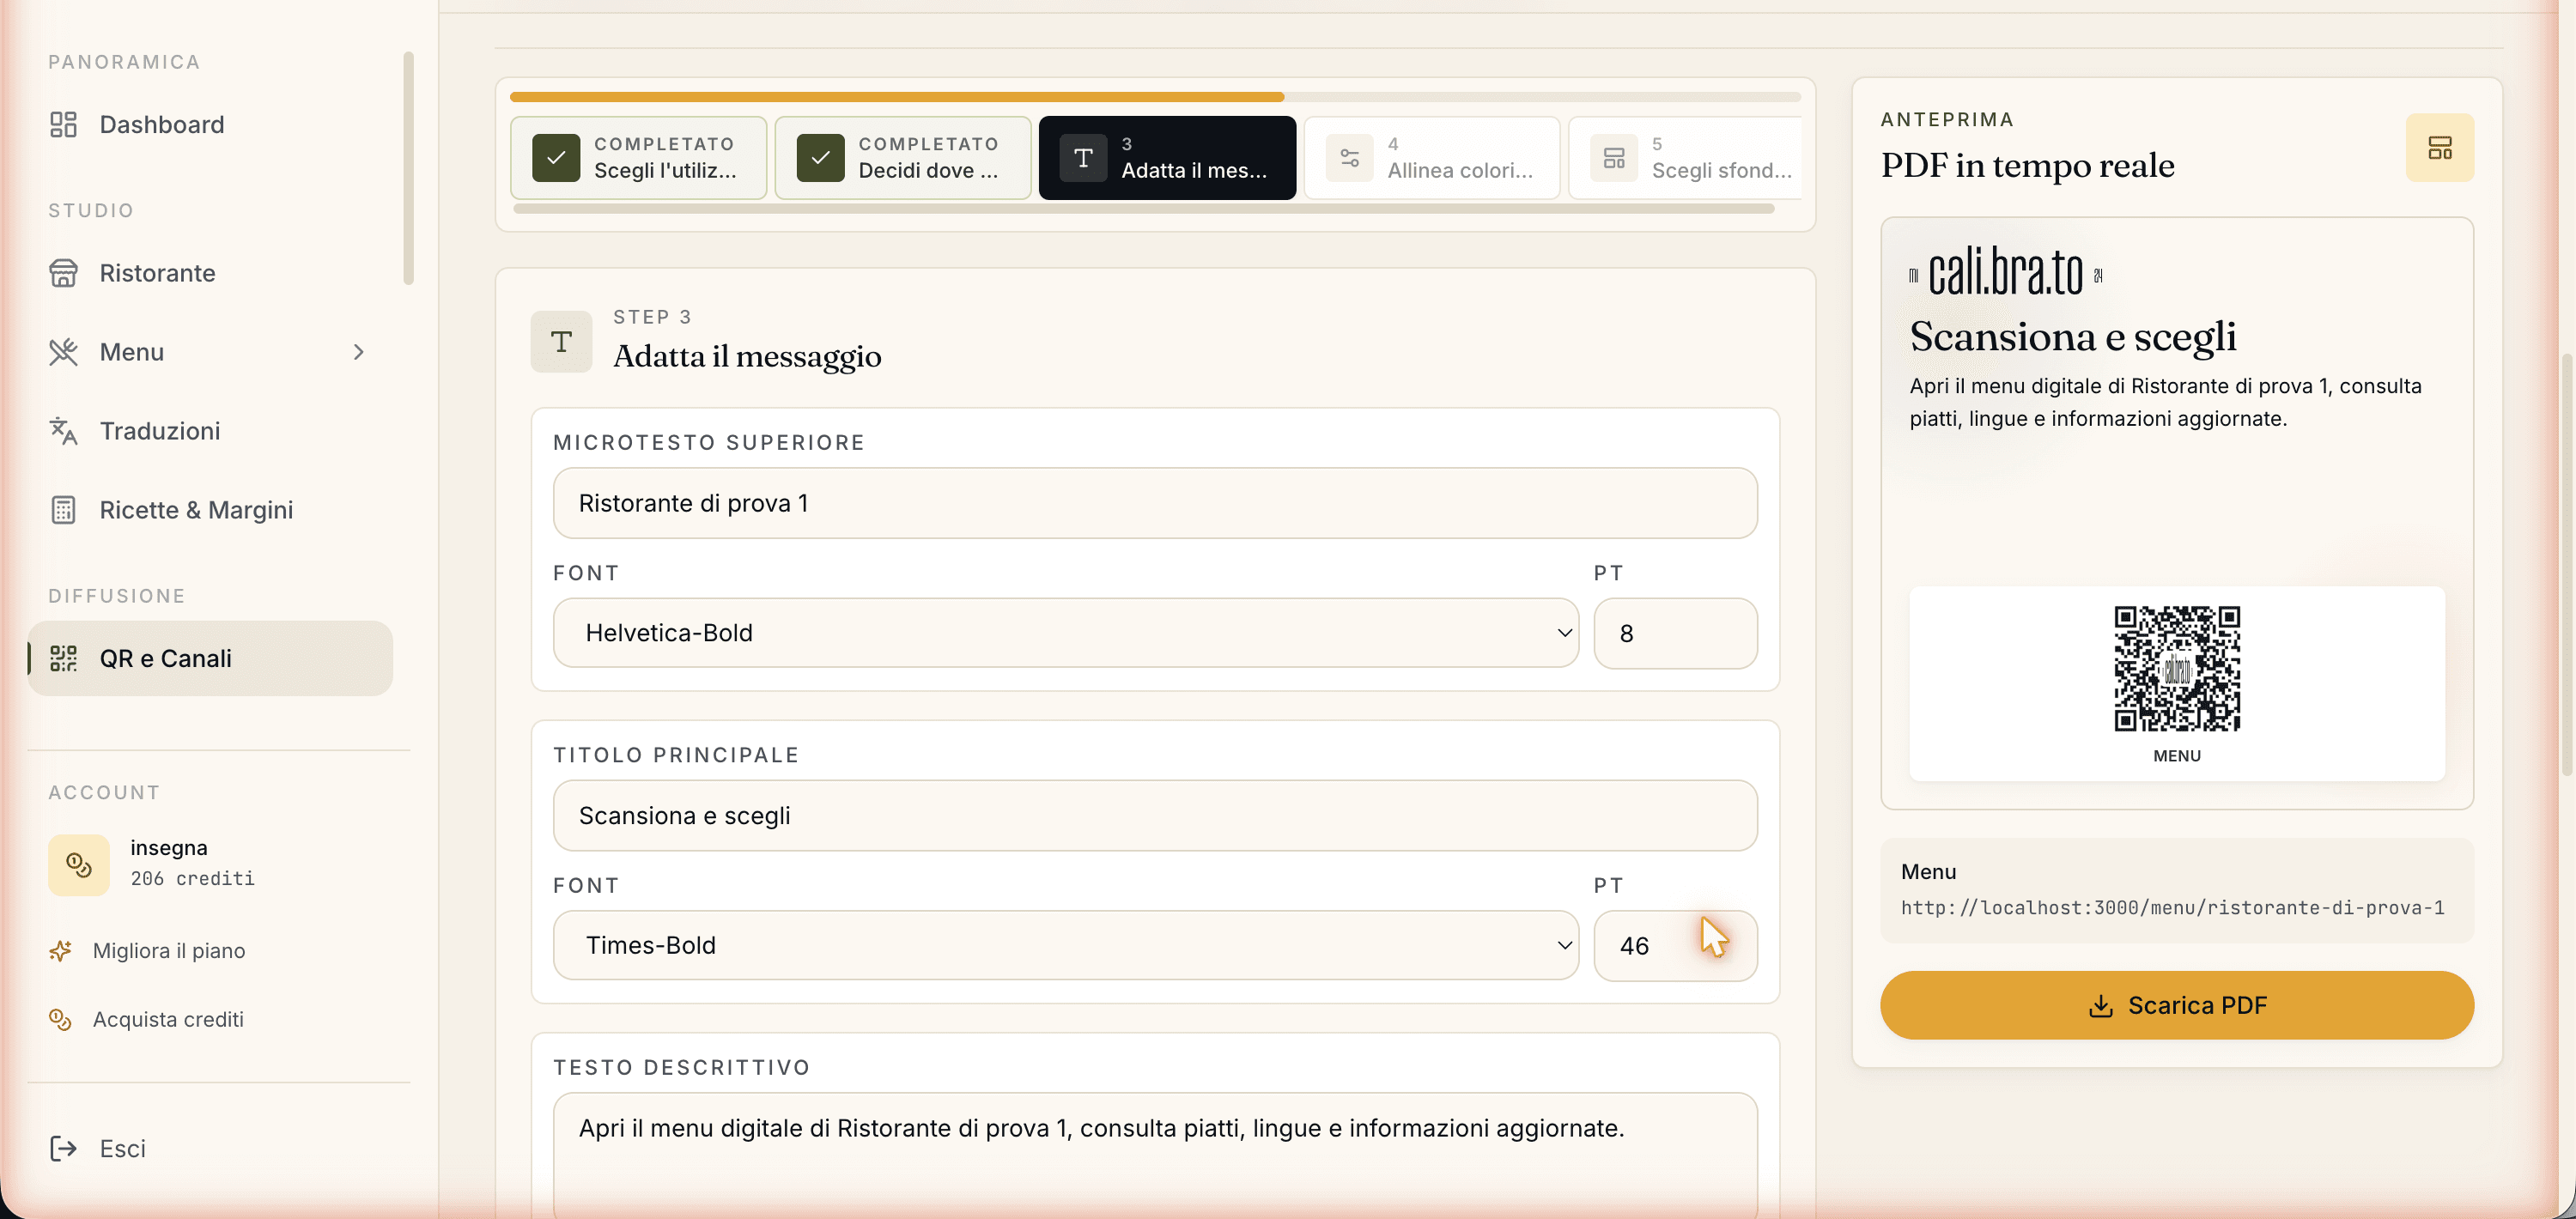
The fields change with the chosen layout. For each one you pick the font (seven options across Helvetica, Times and Courier) and the size, so you stay consistent with your other printed materials:
- Top microcopy — the little line above the headline, short (e.g. "Book · Menu · Carteia").
- Headline — the main message (e.g. "Scan and choose").
- Descriptive text — one line that explains what the guest finds in the menu.
- Note — a service note (e.g. "Free Wi-Fi"; not on the social and window-sticker layouts).
- QR labels — the text under each QR ("Menu", "Restaurant"); appears based on layout and chosen destination.
- Footer line — the closer (e.g. venue name, website).
- Cube: top face / bottom face — only for the Cut-out cube layout, the texts for the two free faces.
Step 4 — Sort out colors and details (Style)
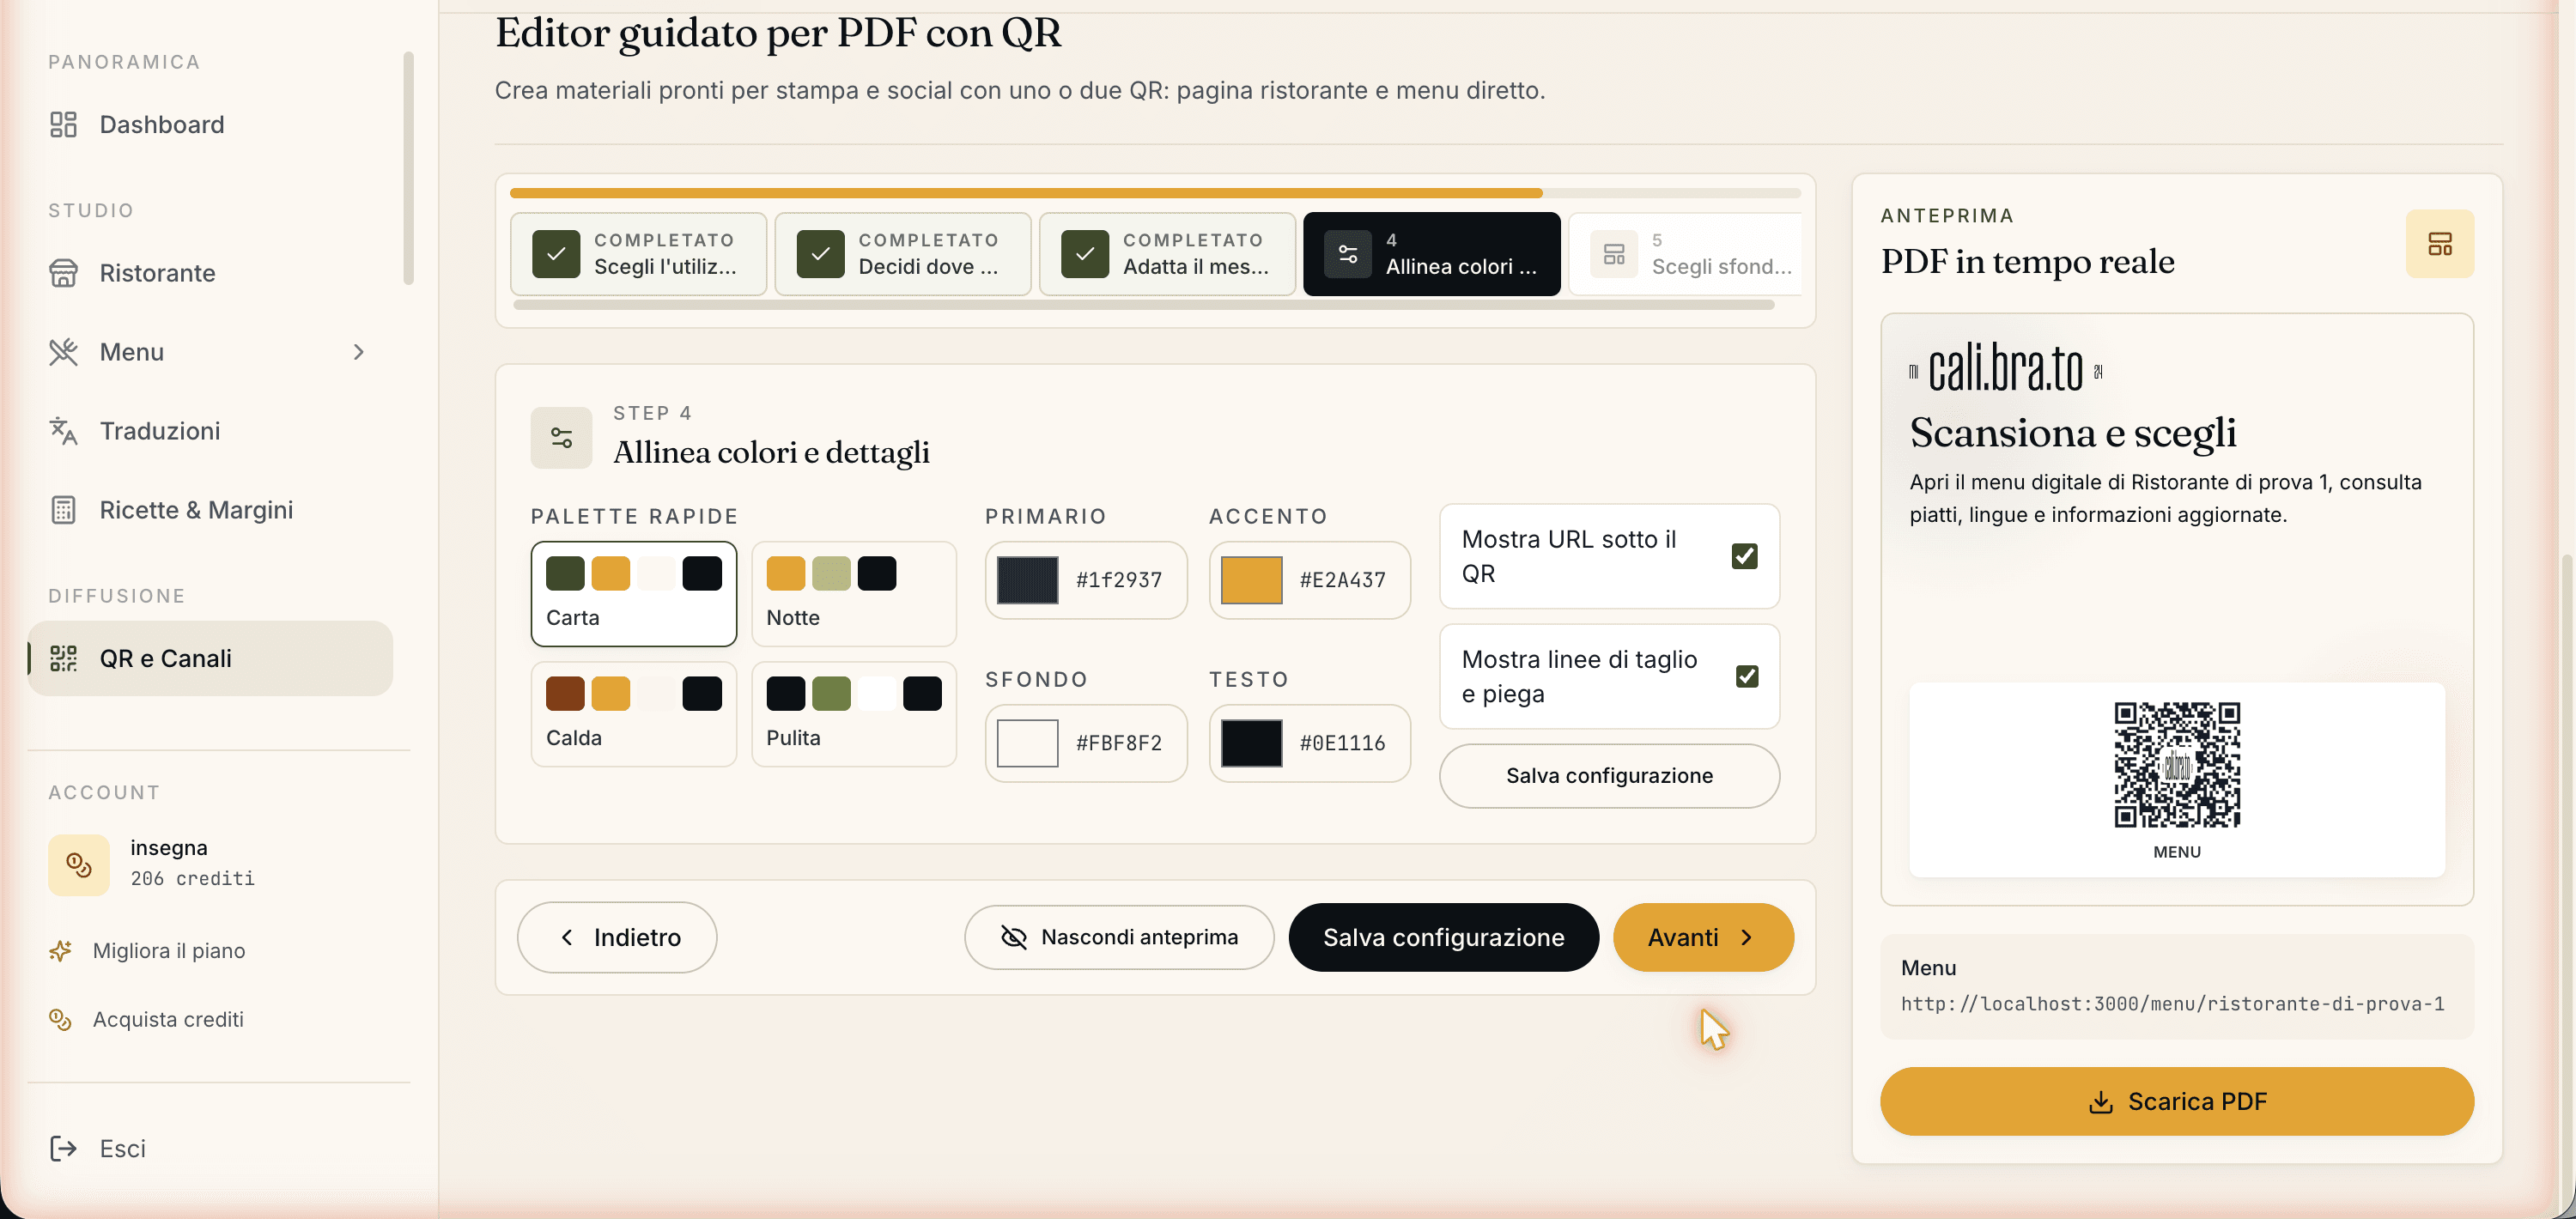
- Four ready palettes: Carteia (the brand's olive and ochre), Night (dark background), Warm (terracotta), Clean (black and white, high contrast).
- Four custom colors: Primary, Accent, Background, Text. Tweak a palette or build your own from scratch. Each color takes a hex code (e.g.
#1F2937). Show URL under the QR— turn it on or off: prints or hides the readable link under the QR. Useful on flyers, so people who don't scan can still type it.Show cut and fold lines— prints the guides for cutting and folding (useful for stands, cube, folded flyer). Turn them on for the proof, off for the final print.Save configuration— stores everything on the venue. Next time you open it, layout, copy, colors and background are ready.
Step 5 — Choose background and texture
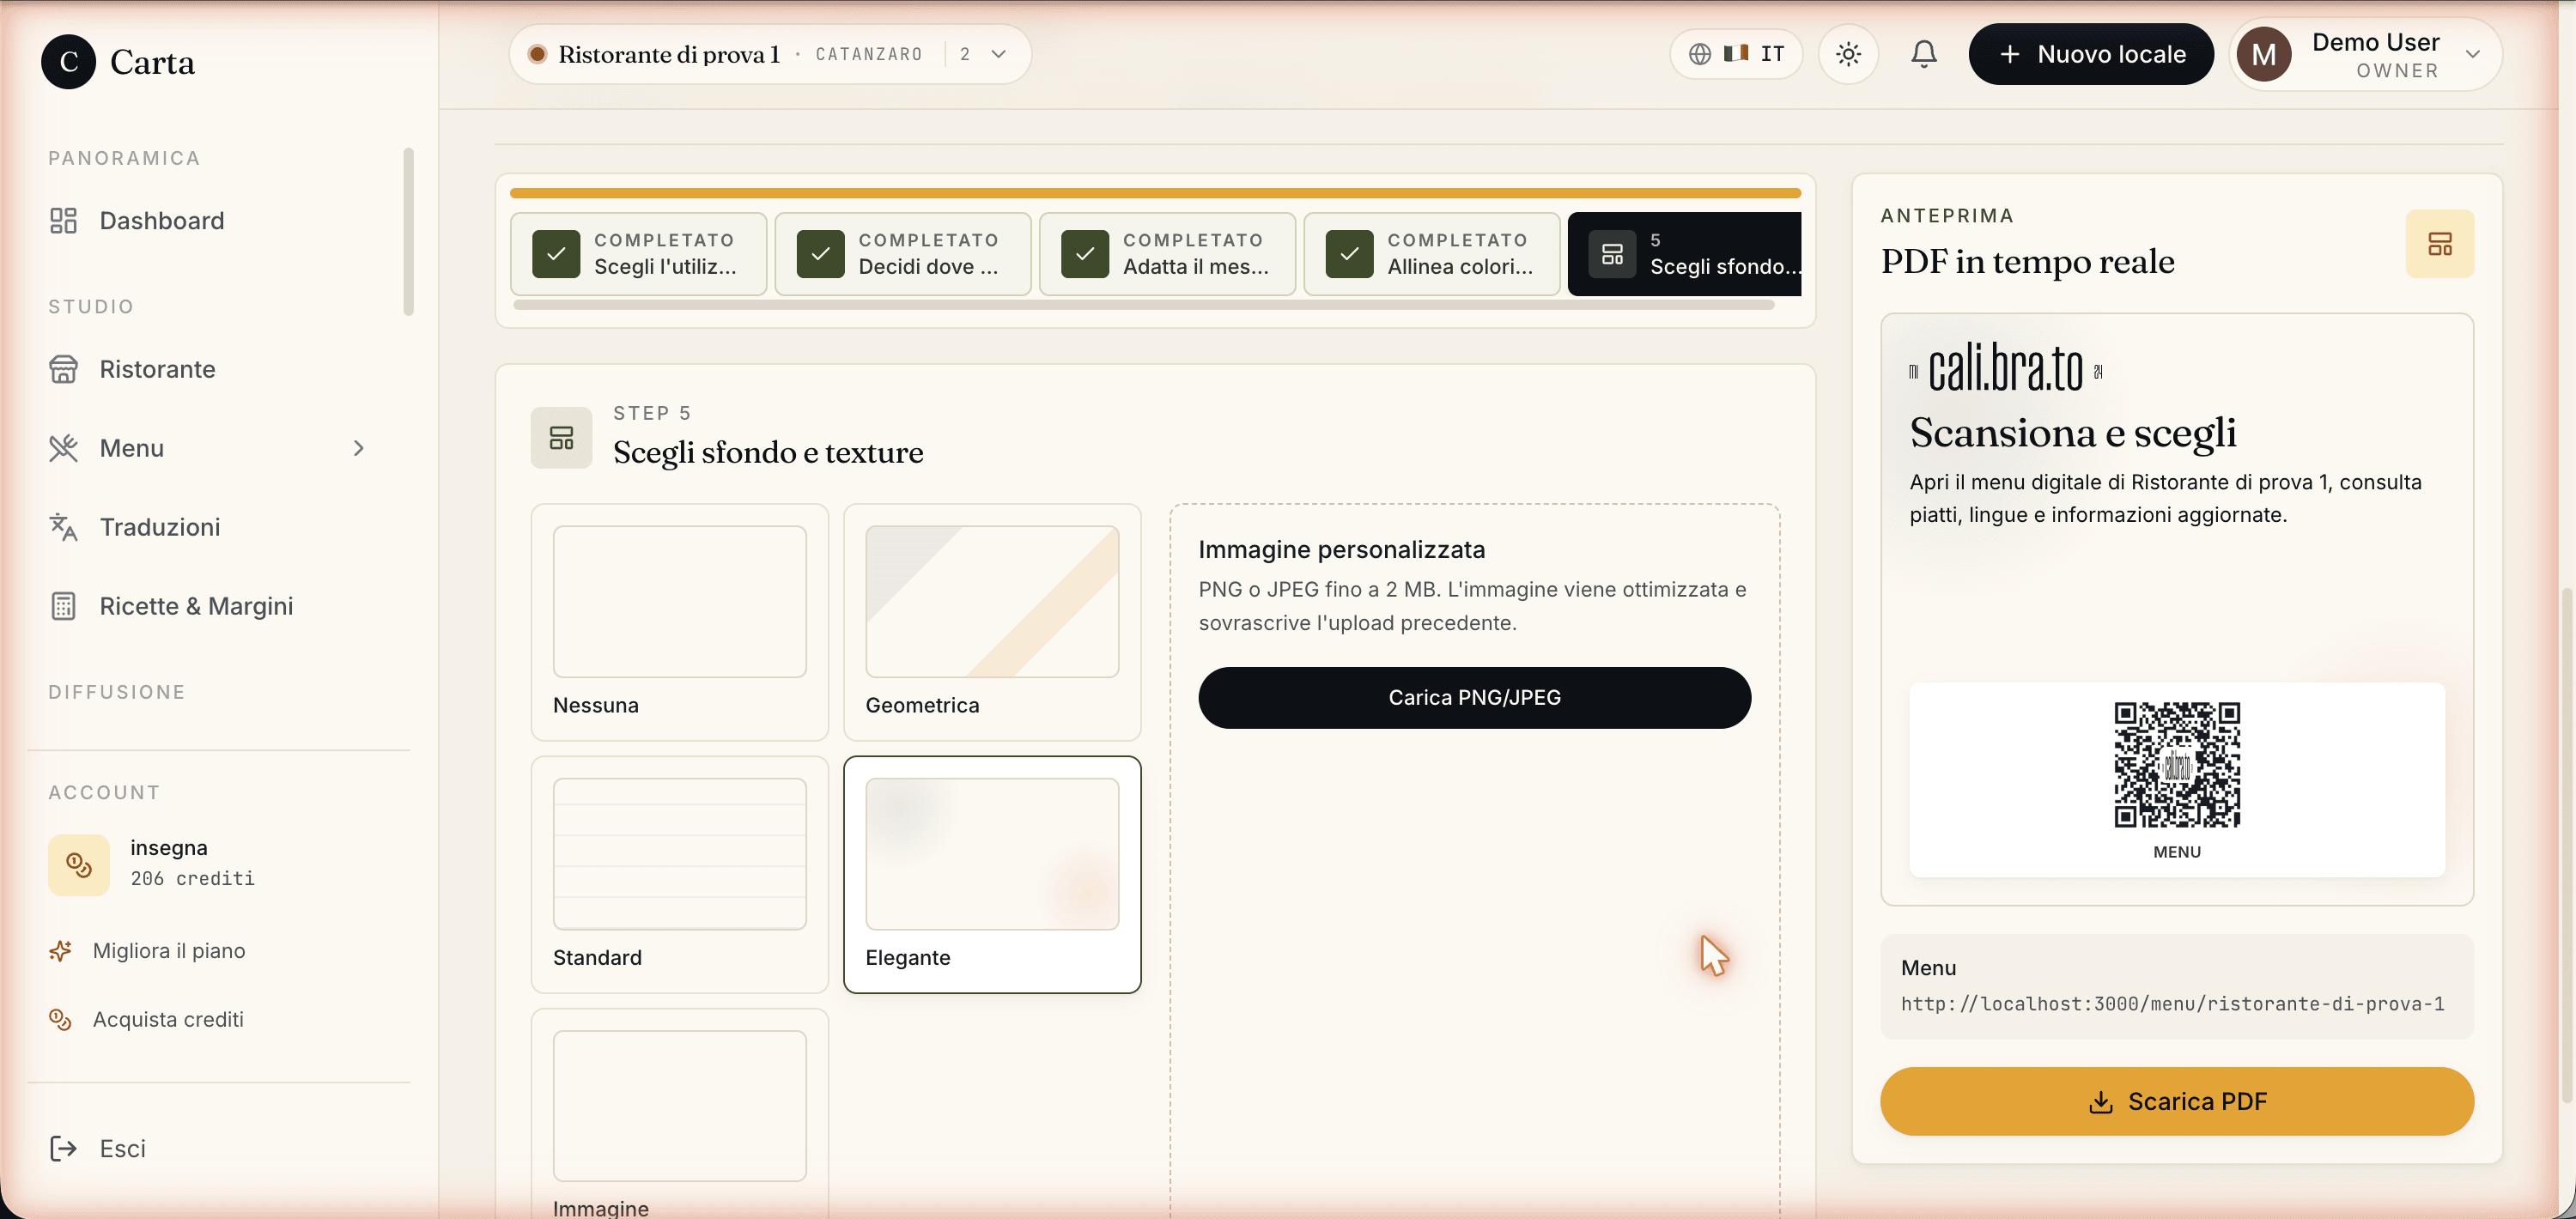
Five options:
- None — a solid fill with the Background color from step 4.
- Geometric — a discreet geometric texture, good for plain materials.
- Standard — the classic Carteia texture, neutral.
- Elegant — a refined decorative texture, for fine dining and special occasions.
- Image — upload a PNG or JPEG up to 2 MB. It is optimized and replaces the previous one.
What you download at the end
Hit Finish/Download and you get a print-ready PDF, with the right format for the chosen layout. The setup stays saved to the venue: next time you open the editor, everything is there.
A different QR for each table
Available from: Ristorante onward, with the Rooms & Tables module.
- Each table has a unique QR with its identifier (e.g.
?table=12). - Scans are recorded with the table number: handy for stats and for ordering at the table where it is active.
- The per-table data (average time, most-viewed dishes, conversion to booking) is in Insights.
Plan comparison
| Feature | Assaggio | Osteria | Bistro | Ristorante | Insegna | Insegna Plus |
|---|---|---|---|---|---|---|
| Download PNG | Yes | Yes | Yes | Yes | Yes | Yes |
| Download SVG | Yes | Yes | Yes | Yes | Yes | Yes |
| Carteia mark removed from QR | No | Yes | Yes | Yes | Yes | Yes |
| Your venue logo at the QR center | No | Yes | Yes | Yes | Yes | Yes |
| Guided PDF editor (7 layouts) | No | Yes | Yes | Yes | Yes | Yes |
| 4 palettes + colors + 7 fonts | No | Yes | Yes | Yes | Yes | Yes |
| 5 backgrounds + image upload | No | Yes | Yes | Yes | Yes | Yes |
| Saved configuration | No | Yes | Yes | Yes | Yes | Yes |
| A different QR per table | No | No | No | Yes | Yes | Yes |
| Per-table stats | No | No | No | Yes | Yes | Yes |
Print tips
- Minimum size of the QR on the table: 30×30 mm. Smaller, and older phones struggle to read it in low light.
- White border around the QR: leave at least a few millimeters clear (about 5 mm on a normal print).
- Matte material, not glossy: reflections on the phone ruin the scan.
- Position: within reach of a seated guest, not in the middle of the plates.
- Test with several phones: scan the proof with three different phones (an iPhone, a recent Android, a budget Android) before a volume print. If the center logo is too big or the contrast is low, the QR becomes unreadable.
Related features
- Insights & stats — measure QR scans by venue and by table.
- Rooms & tables — table management and unique per-table QRs.
- Plans & credits — what each plan includes.
- Publishing the menu — the QR points to the published menu: publish it first.
Frequently Asked Questions
- If I change dishes or prices, do I have to reprint the QR?
- No. The QR always points to your live menu: change dishes, prices or languages and the QR stays the same. Even if you close and reopen the menu at the start of a season, the printed QR keeps working.
- What exactly do I download on Assaggio?
- The menu QR in PNG and SVG, ready to print or use digitally. Carteia's logo sits at the center. From Osteria onward the mark disappears, from Bistro onward you place your own logo at the center and the guided PDF editor turns on.
- Can I buy the guided editor with credits?
- No. It is a plan feature: you unlock it by moving to Osteria or higher. Credits are for other things (menu PDF export, AI, translations), not for unlocking the QR editor.
- Can I have a different QR for each table?
- Yes, from the Ristorante plan onward with the Rooms & Tables module: every QR carries its table number, handy for stats and for table ordering where it is active.
Version history
v4.0.02026-05-29— Added the Osteria and Insegna Plus plans; clarified that the Carteia mark is removed from Osteria while your venue logo at the center arrives from Bistro. Conversational, benefit-led tone. 6-plan comparison table.v3.0.02026-05-22— Full revision: step-by-step guided PDF editor with a screenshot per step. Step 2 (Menu only / Venue page only / Two separate QRs), Step 4 (Carteia/Night/Warm/Clean palettes + custom colors), Step 5 (None/Geometric/Standard/Elegant/Image).v2.0.02026-05-20— Added QR Studio with 7 PDF layouts, 4 palettes, 5-step wizard.v1.0.02025-11-10— First publication.